
Our first Effect
Let's create together our first effect!
Target of this effect is to show the general structure of an effect, make you confident with the API and workflow.
Requirements
- An installed and running Hyperion. You need access to the filesystem where Hyperion has been installed.
- Text editor (of your liking, i would recommend Visual Studio Code)
- Navigate to the "custom-effects" folder of your Hyperion installation (Inside .hyperion folder of your home directory)
- Configure a led matrix layout at "LED Hardware"-section at the web configuration to 10x10 LEDs
Start
First, we start with the python file. Create a new file called neweffect.py in your custom-effects folder.
We need to import some modules, hyperion and time is always required. The time module comes from Python, if you want to know, what methods such a module has, visit the Python documentation. What hyperion can do, is already explained at Effect Engine Development Framework.
# Let's import our modules, so we can use them
import hyperion, time

# Create a loop, this loop runs until the user stops the effect
while not hyperion.abort():
  # Here we are inside the loop, let's do something
  # According to the documentation of hyperion.imageDrawPoint()
  # The position of this point is 2 at x-axis and 5 at the y-axis with a thickness of 1 pixel and color red
  hyperion.imageDrawPoint(2,5,1,255,0,0)
  # Now we need to tell Hyperion that we want to send the image we painted
  hyperion.imageShow()
  # As we are still in our loop let's have a break to slow down the execution. We should never waste CPU power :)
  # Sleep a second until the loop starts from the beginning
time.sleep(1)Recap:: First effect finished! We printed a red dot with a size of one pixel on an empty image and sent that to Hyperion.
Configuration
Let's test our neweffect.py. Create a new file called neweffect.json. And place the following code inside
{
	"name" : "My first own effect!",
	"script" : "neweffect.py",
	"args" : {
	}
}
Let's talk about what we have done here
- The
neweffect.jsoncontains the configuration for our effect. - The
nameproperty is the effect name which is displayed at the effect list and could be freely defined. - The
scriptproperty points to the python file it should start. - The
argsproperty contains options and their values, for example a color, speed and so on. We leave this empty for the moment.
After you added this file to your custom-effects folder, you need to restart Hyperion once
Now you should see the "My first own effect!" effect at the remote page effect list. Start the effect, you should see something like this at led visualization.
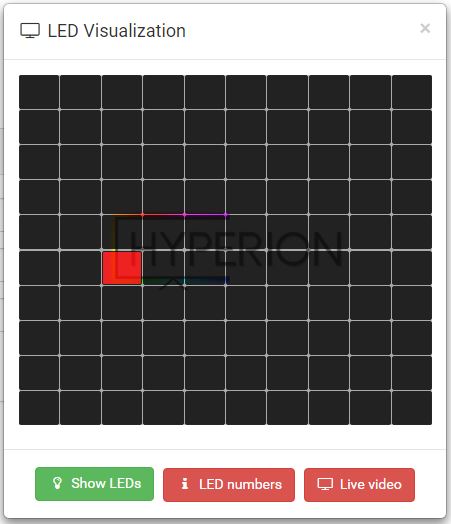
According to the coordinate system, we are at 2 at the x-axis and 5 at the y-axis like written before. Perfect!
Add color option
Now we want to make the color of the dot configurable.
Let's edit the neweffect.py.
import hyperion, time

# Let's get the value of option custom-color, values will be saved in the color variable
color = hyperion.args.get('custom-color', (0,255,200))

while not hyperion.abort():
  # Get the color information from the variable color
  hyperion.imageDrawPoint(2,5,1,color[0],color[1],color[2])
  hyperion.imageShow()
time.sleep(1)- With
hyperion.args.get()we grab the values from the neweffect.json that starts this python file (from theargsproperty of the neweffect.json, which is currently empty.). - The color array at the end of
hyperion.args.get('custom-color', (0,255,200))is a fallback value as we don't deliver acustom-colorproperty inside the args of the neweffect.json. This ensures always a working effect, choose these default values wisely. - As you see the
hyperion.imageDrawPoint(...)got also a modification, as we write thecustom-colorinto the variablecolorwe access the values withcolor[0]which is 0,color[1]which is 255 andcolor[2]which is 200.
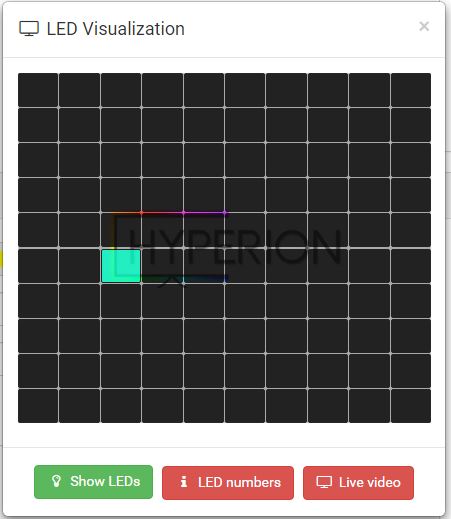
Save the neweffect.py and restart the effect, a restart of Hyperion is not required
It should now look like this
More dots!
Now we have a single dot, and we prepared the color for the dot to be configurable. Now we want more of them!
Again we edit the neweffect.py
import hyperion, time, random

color   = hyperion.args.get('custom-color', (0,255,200))
iWidth  = hyperion.imageWidth()
iHeight = hyperion.imageHeight()

while not hyperion.abort():
    hyperion.imageDrawPoint(random.randint(0,iWidth),random.randint(0,iHeight),1,color[0],color[1],color[2])
    hyperion.imageShow()
time.sleep(1)- We grab now the width (
hyperion.imageWidth()) and height (hyperion.imageHeight()) of the image to make sure that we can fill the entire image with dots. For the required randomness we import random and userandom.randint()with a minimum value of 0 and a maximum value of our width and height. This creates random integer numbers. - Keep in mind that the user setup has always a different width, height and even the ratio between them is dynamic based on the led layout.
- Never use fixed positions, thickness,... calculate them always!
So this is the image when we run the effect again.
Each second (remember the sleep.time(1)) it paints at a random position a new dot, endless. It doesn't check if there is already a dot, it just overwrites the old dot.
More color
Let's add an option which force the effect to paint optional a random color for each dot instead always the same.
Again we edit the neweffect.py
import hyperion, time, random
# a helper function to convert HSV to RGB space
def hsv_to_rgb(h, s, v):
  if s == 0.0: v*=255; return [v, v, v]
  i = int(h*6.)
  f = (h*6.)-i; p,q,t = int(255*(v*(1.-s))), int(255*(v*(1.-s*f))), int(255*(v*(1.-s*(1.-f)))); v*=255; i%=6
  if i == 0: return [v, t, p]
  if i == 1: return [q, v, p]
  if i == 2: return [p, v, t]
  if i == 3: return [p, q, v]
  if i == 4: return [t, p, v]
  if i == 5: return [v, p, q]

color       = hyperion.args.get('custom-color', (0,255,200))
randomColor = bool(hyperion.args.get('random-color', True))
iWidth      = hyperion.imageWidth()
iHeight     = hyperion.imageHeight()

while not hyperion.abort():

  if randomColor:
    color = hsv_to_rgb(random.uniform(0,1), 1, 1)

  hyperion.imageDrawPoint(random.randint(0,iWidth),random.randint(0,iHeight),1,color[0],color[1],color[2])
  hyperion.imageShow()
time.sleep(1)- To generate bright colors we write our own function:
def hsv_to_rgb(h, s, v): ... - So we add also a new option
randomColorwhich is True, we parse True/False values always asbool(...)to make sure they are really bool, and not a string. If you don't know what's the difference between a bool, string, int and float is, do a short browse at the python documentation. - Inside our
while not hyperion.abort():loop we check withif randomColor:if randomColor is true or not, if it is true (enabled) we overwrite our variablecolorwith a random color that is generated withhsv_to_rgb(h,s,v). We just randomize h for Hue with our random functionhsv_to_rgb(random.uniform(0,1), 1, 1), the h accepts values between 0 and 1. What is hue? Play around with hue at this colorpicker. You see why this is a easy way to generate bright colors with a simple random function.
Save the file and restart the effect
Clear the image
Let's add a option to set the image to black on a configurable interval in seconds. This overwrites all dots with black.